HISPEEDIDO V5 Pre-Laminated IPS Screen Kit For Game Boy Advance SP — No Shell Cutting Required
📺 Pre-Laminated IPS Display For Game Boy Advance SP 📺
🔍 720 × 480 Resolution With 3× Integer Scaling 🔍
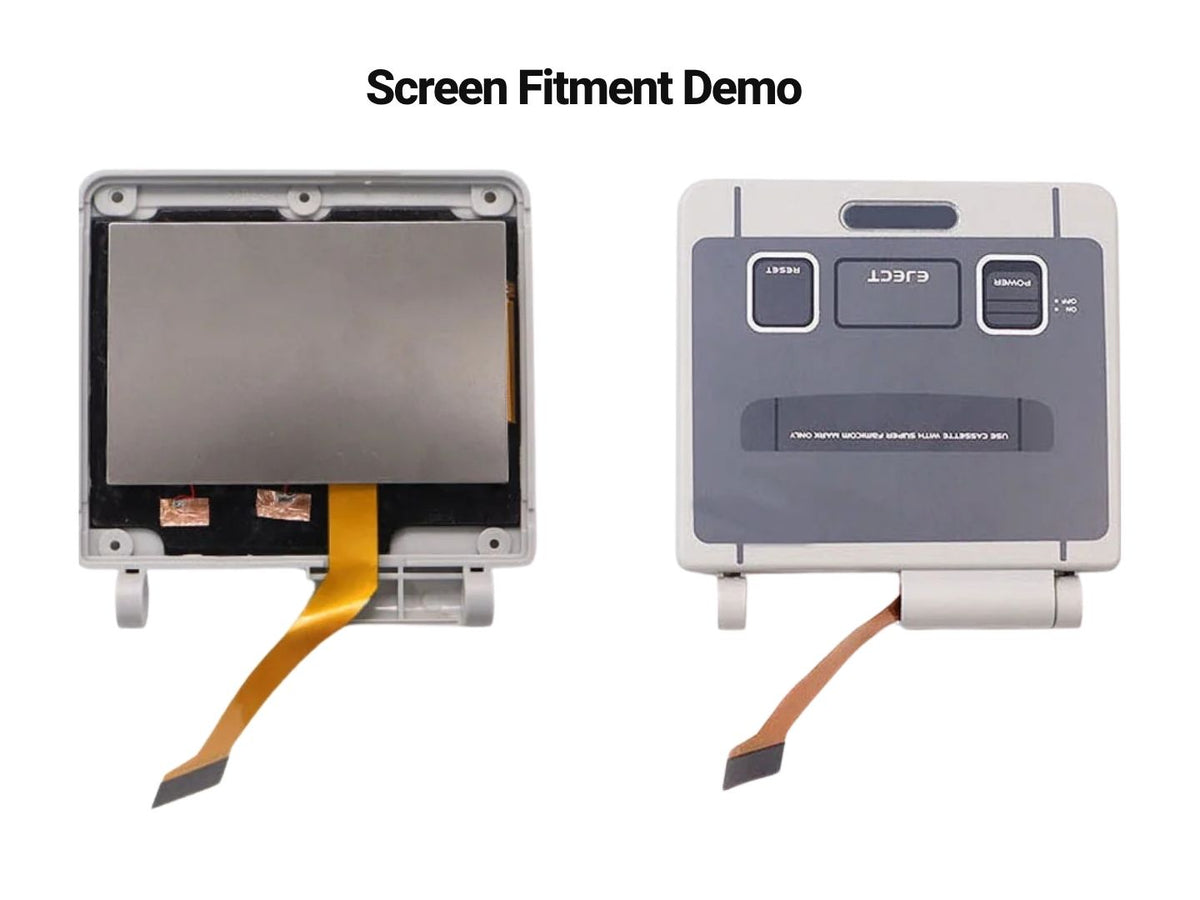
🧩 Drop-In Fit With No Shell Cutting Required 🧩
🌈 15 Brightness Levels & 8 Colour Modes 🌈
🕹️ Normal, Retro Pixel & Two Scanline Effects 🕹️
👆 Built-In Touch Controls For Brightness & Colours 👆
⚙️ On-Screen Menu With Optional One-Wire Soldering ⚙️
🎚️ Desaturation Adjustment & Touch Shortcut On/Off 🎚️
👀 Wide Viewing Angles Up To 178° 👀
🛡️ 12-Month Retrolize Warranty 🛡️
Couldn't load pickup availability
Description
Description
Upgrade your Nintendo Game Boy Advance SP with the HISPEEDIDO V5 Pre-Laminated IPS Screen Kit, replacing its original display with a bright, adjustable backlit screen. Designed for AGS-001 and AGS-101 consoles, this 3-inch-class IPS LCD brings clearer visibility to your games, with viewing angles up to 178° and a choice of picture settings for different games and lighting conditions.
The 720 × 480 display uses exact 3× integer scaling from the Game Boy Advance’s native 240 × 160 resolution. Each original game pixel is represented by a uniform 3 × 3 block of display pixels, giving nine display pixels per source pixel. This keeps pixel sizes consistent and preserves the original picture proportions without uneven scaling.
The glass lens is pre-laminated to the LCD, forming a single screen assembly. The driver board is integrated into the LCD’s metal housing, keeping the display electronics together in one unit. There is no separate lens to align or bond during installation.
Choose from 15 brightness levels and eight colour modes, allowing you to adjust the picture to suit your surroundings and preferred appearance. The screen also offers four display effects: Normal, Retro Pixel, Scanline 1 and Scanline 2. Normal provides a clean picture, Retro Pixel adds a defined pixel-grid appearance, and the two scanline modes provide alternative retro display styles.
Built-in touch controls let you change brightness and colour modes without soldering the optional control wire. For control through the console’s original brightness button, connect the single control wire. This also enables the on-screen display menu, where you can access additional adjustments, including desaturation and touch-shortcut settings.
The kit is designed as a drop-in replacement requiring no shell cutting when fitted to a standard compatible Game Boy Advance SP screen housing. You will still need to disassemble the console, disconnect the original screen and carefully route the replacement ribbon cable through the hinge. Check the fit before securing the screen, particularly when using an aftermarket housing.
This listing is for the LCD kit only, making it suitable for upgrading an existing console or incorporating into a wider restoration. A console, replacement shell and battery are not included. Fully test the screen before installation, soldering or removing the testing/install void sticker.
Supplied by Retrolize with fast UK delivery and a 12-month Retrolize warranty, subject to the testing, installation and warranty terms below. International delivery is available to supported destinations shown at checkout.
Explore our Game Boy Advance SP parts, mods and upgrades for other components for your repair or restoration, including our 1000mAh replacement battery for Game Boy Advance SP.
Specifications
Specifications
Brand: HISPEEDIDO
Product Name: HISPEEDIDO V5 Pre-Laminated IPS Screen Kit For Game Boy Advance SP
Product Type: IPS screen upgrade kit
Screen Version: V5
Compatible Consoles: Nintendo Game Boy Advance SP AGS-001 and AGS-101
Display Type: Backlit IPS LCD
Display Size: 3.0-inch class
Display Resolution: 720 × 480
Native Game Resolution: 240 × 160
Integer Scaling: 3× horizontally and vertically
Pixel Mapping: Nine display pixels per original game pixel
Viewing Angle: Up to 178°
Screen Lens: Pre-laminated glass
Driver Board: Integrated into the LCD enclosure
Brightness Levels: 15
Colour Modes: 8
Display Effects: Normal, Retro Pixel, Scanline 1 and Scanline 2
Desaturation Adjustment: Supported
Touch Controls: Brightness and colour modes
Touch Shortcut Setting: On/off through the OSD menu
OSD Access: Requires one soldered control wire
Original Brightness Button Control: Requires one soldered control wire
Shell Cutting: Not required with a standard compatible screen housing
Console Included: No
SKU: HSD-GBASP-IPS-V5
Supported Systems
Supported Systems
Nintendo Game Boy Advance SP AGS-001: Supported
Nintendo Game Boy Advance SP AGS-101: Supported
Nintendo Game Boy Advance AGB-001: Not supported
Nintendo Game Boy, Game Boy Pocket And Game Boy Color: Not supported
Nintendo Game Boy Micro: Not supported
Installation And Control Requirements
Standard Compatible GBA SP Screen Housing: No shell cutting required
Third-Party Housing: Check fitment before securing the screen
Basic Screen Operation: No soldering required
Touch Brightness And Colour Controls: No soldering required
Original Brightness Button And OSD Menu: One soldered control wire required
Console Disassembly: Required
Pre-Installation Testing: Required
Critical Info
Critical Info
LCD Kit Only: This listing is for the replacement screen kit. A console, housing shell, battery, buttons and other console components are not included.
Compatible Consoles: Designed for Nintendo Game Boy Advance SP AGS-001 and AGS-101 consoles. This is not the screen kit for the original horizontal Game Boy Advance AGB-001.
No Shell Cutting Required: The screen assembly is designed to fit a standard GBA SP screen housing without trimming. Console disassembly, removal of the original screen and careful routing of the replacement ribbon cable are still required. Check fitment before securing the assembly, particularly with third-party housings.
Soldering And Controls: Basic screen use and touch adjustment of brightness and colours do not require soldering. Connecting one control wire enables the console’s original brightness button and access to the OSD menu.
Pre-Laminated Glass: The glass lens is already bonded to the LCD. Do not separate it from the screen or fit another lens over it.
Test Before Installation: Fully test the screen with the testing/install void sticker intact before installation, soldering, applying adhesive or removing the sticker. Check the picture, brightness settings and touch controls. The sticker must be removed to install the screen, so remove it only after successful testing when you are ready to fit the kit. If a fault appears, leave the sticker intact and contact Retrolize before proceeding.
Handling: Remove the battery before connecting or disconnecting the screen ribbon. Avoid pulling, sharply creasing or trapping the ribbon, and do not press on the LCD or force the housing closed.
Installation Overview
- Switch off the console, remove the battery and carefully open the GBA SP.
- Disconnect the original screen and inspect the motherboard’s screen connector.
- With power removed, temporarily connect the replacement assembly for testing. Leave the testing/install void sticker intact.
- Temporarily power the console to check the picture, brightness settings and touch controls. Remove power again before handling the ribbon or motherboard.
- If a fault appears, stop and contact Retrolize before installation.
- After successful testing, remove the sticker when you are ready to proceed. Fit the screen into the housing and route the ribbon through the hinge without trapping or damaging it.
- If you want brightness-button and OSD control, solder the single control wire using the installation diagram for this exact kit.
- Reassemble the console carefully, refit the battery and check the screen and controls again.
Touch Controls
Brightness: Use the built-in brightness touch control to cycle through the brightness levels
Colour Modes: Use the built-in colour touch control to change the colour mode
Touch Shortcut On/Off: Controlled through the OSD menu; the soldered control wire is required for button-operated menu access
Brightness Button And OSD — Requires One Soldered Wire
Change Brightness: Short press the original brightness button
Open OSD Menu: Hold the brightness button for five seconds
Select Adjustment Item: Long press the brightness button while the OSD is open
Adjust Selected Item: Short press the brightness button while the OSD is open
Package Includes
Package Includes
1 × HISPEEDIDO V5 IPS LCD assembly with pre-laminated glass lens, integrated driver board and ribbon cable
1 × Control wire
Warranty Information
The HISPEEDIDO V5 Pre-Laminated IPS Screen Kit For Game Boy Advance SP includes a 12-month Retrolize warranty from the date of delivery, covering manufacturing defects and hardware faults arising during normal use.
Pre-Installation Testing: Fully test the screen with the testing/install void sticker intact before installation, soldering or applying adhesive. Check the picture, brightness settings and touch controls. If you identify a fault, leave the sticker intact, stop and contact Retrolize with your order number and a description of the issue.
Testing And Installation Sticker: The sticker must be removed before the screen can be installed. Remove it only after successful testing, when you are ready to proceed with installation.
Returns After Installation: We do not accept discretionary returns once the testing/install void sticker has been removed or installation has been attempted. This condition does not restrict your statutory cancellation rights or rights concerning faulty goods.
Exclusions: The warranty does not cover damage caused by incorrect installation, soldering, accidental damage, liquid exposure, misuse, incorrect power or unauthorised alterations to the screen assembly. This includes torn ribbon cables, damaged connectors, lifted solder pads, heat damage and cracked glass or LCD panels caused during fitting or handling. Problems caused by unsuitable housings, forced fitment or incompatible console hardware are not manufacturing defects in the screen kit.
Warranty claims remain subject to the full Retrolize warranty terms. This warranty is additional to your statutory rights, which remain unaffected.
Additional Information
Will This Fit Both AGS-001 And AGS-101 Consoles?
Yes. This screen kit is designed for both Nintendo Game Boy Advance SP models.
Do I Need To Cut The Original Shell?
The screen is designed to fit a standard compatible GBA SP screen housing without cutting. You still need to disassemble the console and route the ribbon cable carefully. Check fitment when using third-party housings.
Can I Use The Screen Without Soldering?
Yes. Basic screen operation and touch adjustment of brightness and colour modes do not require soldering. One soldered control wire is required for the original brightness button and OSD menu.
What Does 720 × 480 Resolution Mean For GBA Games?
The Game Boy Advance outputs a 240 × 160 picture. This panel scales that picture by three in each direction, so every original pixel occupies a uniform 3 × 3 block of display pixels.
Do I Need A Separate Screen Lens?
No. The glass lens is already bonded to the LCD. Do not separate the laminated assembly or place another lens over it.
Which Display Effects Are Included?
Normal, Retro Pixel, Scanline 1 and Scanline 2.
Can I Disable The Touch Controls?
Yes. The touch-shortcut setting can be changed through the OSD menu. Access to this menu requires the soldered control wire.
Does The Kit Include A Shell Or Battery?
No. This listing is for the LCD kit and the accessories listed below. A console, shell and battery are not included.
Will This Fit The Original Game Boy Advance?
No. The horizontal Game Boy Advance AGB-001 uses a different screen kit. This product is specifically for the Game Boy Advance SP.
Should I Test The Screen Before Installing It?
Yes. Fully test the screen with the testing/install void sticker intact before installation, soldering or applying adhesive. Remove the sticker only after successful testing, when you are ready to install the screen.
Do You Offer International Delivery?
International delivery is available to supported destinations. Available services and charges are shown at checkout.
Share